This page is about trying to improve your adsl connection speed and some of the things that may help improve your adsl performance.
|
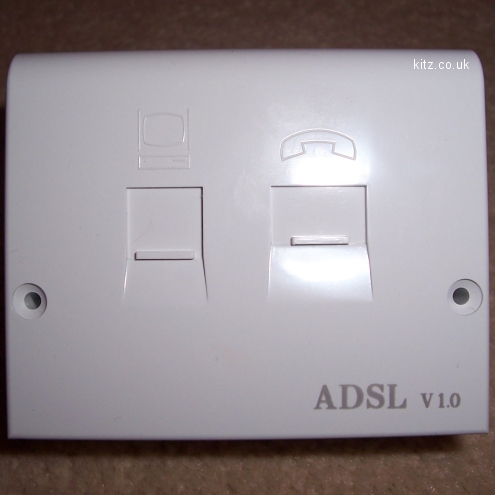
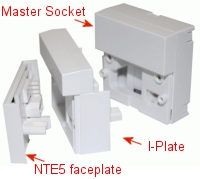
The Master Socket
|
 |
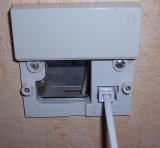
The photo on the left shows a BT master socket with NTE5 faceplate.
By undoing the two screws we can remove the faceplate to access the test socket. If the adsl signal is better with the router plugged into the test socket then its well worth removing the ring (bell) wire and/or considering fitting an NTE5 adsl filtered faceplate.
In order to check whether improvements can be made to your adsl connection speeds, take a reading of your router linestats from its original location, then take another set plugged in to the test socket.
Compare the difference - If your sync speed is higher, and/or if your attenuation is lower and/or your SNR Margin is higher, then the chances are that you will be able to improve your connection.
Please note that the master socket is the demarcation point between BT's equipment and your own. Therefore you must not tamper with any equipment or cabling before this point. |
|
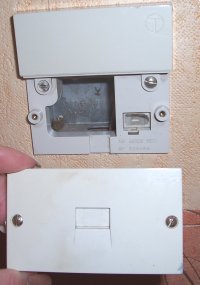
The test socket
|
The test socket is the point used by BT engineers to test for telephone and adsl faults. If an engineer is able to get a good signal from here then this points to the fault being on the customers side and therefore any repairs / engineer callout fees will be chargeable.
To test your adsl connection from this point either use either an inline adsl filter or one of the cables that is normally used with a 56k modem. |
 |
|
Telephone Cable
|
Telephone extension cable has 4 strands (2 pair). |
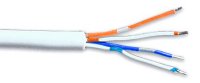 |
| Pin |
Colour |
Use |
| 1 |
|
Not used |
| 2 |
Blue/white |
"B" Wire |
| 3 |
Orange/white |
Ring wire |
| 4 |
White/orange |
Used for completeness or as earth in PABX systems. |
| 5 |
White/Blue |
"A" wire |
| 6 |
|
Not used |
|
Pre 1980 wiring:
Pin2 Blue,
Pin3 Brown,
Pin4 Green,
Pin5 Orange.
These colours should be used as a guide. Some homes may have non-standard wiring. |
| |
| The Ring wire |
What is the ring wire?
The "ringwire" or bell wire was traditionally used for pulse dialling systems to transmit the ringing tone to telephones when your phone rings.
Most modern phones use tone dialling and/or electronic ringers and therefore do not require this connection to be present, and will still ring if the ring wire is disconnected.
Why remove the ring wire?
Unfortunately, the ring wire can also act as an antenna, picking up interference from other electrical equipment in and around the house.
It is often found that disconnecting the ring wire improves the stability of a connection, sometimes considerably, especially on "star" wired telephone systems.
|
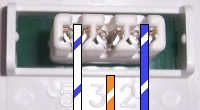
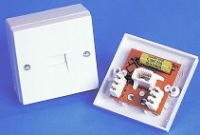
| Removing the Ring Wire |
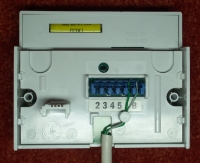
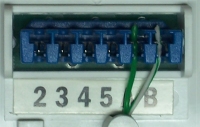
To disconnect the ring wire, carefully pull the wires out of the IDC terminals numbered 3 and 4, leaving only wires 2 and 5 connected. The photograph on the right shows an NTE5 faceplate with the ringwire disconnected, and tucked out of the way.
In some cases, it is only necessary to disconnect the wire from the master socket, but it may be necessary to disconnect it from all extension sockets too, particularly if you have a "star" wired system.
Whilst you are doing this, look at where the remaining wires are connected to the IDC block. They should be neatly cut off as close to the block as possible, with no overhang or "tails" showing.
Adsl filters have their own capacitor, therefore taking the ringwire out of the loop still means that your phones will ring.
|
 |
Note:
The above diagram assumes standard telephone wiring. Some homes may have older or non-standard wiring.
In which case it is terminal 2 and terminal 5 that need to remain connected.
Terminal 3 is for the bell wire, whilst terminal 4 is attached for neatness - neither of these 2 wires are required for modern telephones. |
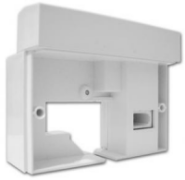
| Installing an adsl filtered NTE5 Faceplate |
|
BT Openreach adsl NTE5 faceplate
|
An adsl filtered NTE5 faceplate is the most efficient form of filtering available as it separates voice and adsl data at the point of entry to your property and and also negates the need for separate inline filters around the home.
Note that any extension sockets will only carry the telephone signal and adsl modem/routers must be connected into the left hand RJ11 socket. |
adsl filtered NTE5 faceplate (reverse)
|
To install an adsl filtered NTE5 faceplate:
- Remove the 2 screws holding the existing faceplate on to the master socket.
- Carefully remove wiring from existing faceplate.
- Lay wires over the following pins on the new faceplate:
Pin 2 - Blue w/ white
Pin 5 - White w/blue
Pin 3 is for the ring wire but for this example we are not connecting it
- Using a punch down IDC tool or Krone Inserter, firmly push down on the wires so they are secure in the IDC terminals.
- If necessary, carefully trim any wire overhang "tails"
- Secure cable with to the round cable post using the supplied cable tie.
- Screw new faceplate on to the master socket
|
ADSL filtered NTE5 faceplates can be purchased from:
www.clarity.it
www.adslnation.com
www.solwise.co.uk
|
| NTE5 Faceplate - Ethernet CAT5e Extension variation |
Like many homes these days, I have cordless phones with a base station which means that my telephone extension sockets are redundant - Except that is for the extension to the computer room where my router is located.
To give my connection the best possible chance I decided to use CAT5e cable to the extension which fed my adsl connection.
To do this I used a modified BT adsl NTE5 faceplate available from Clarity which has a 6-way IDC connector. The modified plate has two additional terminals marked A + B which can be used to run a dedicated adsl connection using CAT5e cable neatly hidden away.
Although I haven't done so, this adapted faceplate also allows you to run filtered telephone extension via the normal way using terminals 2 + 5 if I should wish to do so at any point in the future.
There is some debate whether using CAT5e/CAT6 cable is beneficial or not. Some users have reported it makes a difference but it really depends on the type of cable used. For eg cheap telephone extension cable (non CW1308) in some homes may well benefit by keeping the adsl connection separate over CAT5e/CAT6 cable.
I'm lucky being on a short line and able to sync at the full 24Mbps, so for me the main benefit was the ability to hide the cable easier rather than having CAT5 sticking out of the socket.. and still keeping my adsl and phone connections separate.
|
Modified NTE5 faceplate
Allows filtered telephone extensions and a dedicated adsl extension.
Pins A + B for adsl extension
Pins 2 + 5 would be used for telephone extension as normal.
|
| Introducing the I-Plate (Interstitial Plate) |
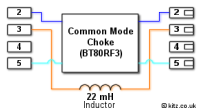
Enter the new I-Plate (Interstitial Plate) from BT.
The iPlate is for NTE5 master sockets and has a 22mH choke which is intended to filter out interference that would normally be picked up on the bell wire*.
The Interstitial Plate is designed for self install without the need for any wiring, or changes to the existing cabling, nor any special tools.
The i-plate is not compatible with the new (2007) NTE5 faceplates marked Openreach which already have a bell wire choke installed.
|
 |
|
All the user needs to do is:
- Unscrew the faceplate from the master socket
- Clip the i-plate on to the existing NTE5 backplate
(it has a hole at the bottom for existing wires to pass through)
- Replace the faceplate over the i-plate and screw back up.
Important note :- The i-plate does not separate voice and adsl data and still requires the need for separate adsl filters on each telephone device.
|
* If you already have an adsl NTE5 faceplate and/or have removed the ring wire, then there isn't much point installing an i-plate.
The 22mH inductor acts as a simple low pass filter which passes the low frequency ringing signal onto the third bell wire, but blocks the majority of the higher ADSL signal from passing through. This effectively isolates the third bell wire from the ADSL carrying pair and minimises the effect that this causes. |
 |
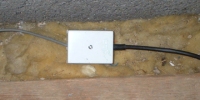
| No NTE5 Master Socket? |
BT have been installing the NTE5 since 1981, but there are still many homes which have Line Jacks as the master. The Master socket can be identified by unscrewing the faceplate and seeing which socket which has the yellow ring capacitor.
Some properties, particularly those where the drop wire enters the property via the loft, may also have a block terminal at the point of entry to the property which then leads to the master socket. |
 |
 |
Its not unusual for many of these systems to be "spur" or "star" wired, which is where there may be several extensions spurred from a point before the master socket in a star fashion, whereas with NTE5 its more normal for an extension to be hooked up to an extension, which is hooked up to another extension etc which in turn is then connected to the master socket in a line. (Think network topology: star -v- bus networks). |
Star wired systems are often those that benefit most - often dramatically - by disconnecting the orange ring wire from the master socket and all extension sockets (see above).
Its important to remember that whilst you are allowed to remove the ringwire, that the demarcation point is the master socket and that anything before this point is the property of BT and should not be tampered with.
|
| Fitting an NTE5 master socket? |
You are NOT allowed to replace any old style master sockets with an NTE5 socket yourself, and this should only be performed by a BT Openreach engineer. Failure to obey these rules may result in prosecution and/or a fine by BT.
However there is a way in which you can legally fit your own NTE5 line box, and that's by making the NTE5 an immediate extension of the master socket and locating the new NTE5 line box next to the old non NTE5 master linebox. Full details how to do this and the equipment required can be obtained from clarity.it
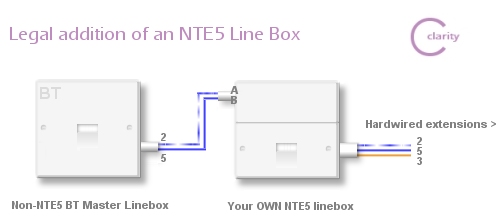
In summary, the line connection points on the rear of the NTE5 unit are two screw terminals labeled A and B. Connect extension wires 2 & 5 from the Master to these terminals, and you now have a working NTE5 line box to do with as you will. Proceed to deploy the rest of your cabling plans, pretending the NTE5 is really your real master box.
Thanks to clarity.it for kind permission to reproduce their diagram |